The importance of sketching

Beddgelert Sketchbook
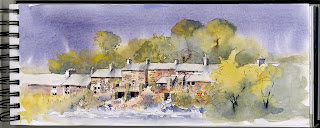
Beddgelert, Snowdonia, Pen and watercolour sketch by Jenny Keal
(click on picture for larger view)
This sketch of the back of the houses along the river in Beddgelert was done during our last painting course at Sygun Fawr Hotel. The initial outlines were drawn with a Sepia Pitt pen size S and then the watercolour washes were added. Some of the washes were done on the spot and I finished them off back in the hotel.David and I believe that the single most useful thing you can do to improve your painting is to take up sketching. Drawing and painting outdoors in front of your subject brings many benefits with it. Not only getting out and about in the fresh air, and having a little exercise if you are able to walk, but being in front of your subject instead of working only from a photograph means you are able to move around and get the best viewpoint, or sketch from several different angles to get any hidden details, and get closer to see details not apparent in a photograph.Photographs are not particularly good at capturing atmosphere and recession but when you are outside looking at a scene, half closing your eyes will reveal the tonal and colour differences between the distant and closer objects.

Sketching in watercolour or pen and wash is a very quick way to capture colour and tone out of doors and it has the added benefit of loosening up your painting style. After all it is only a sketch and not intended for exhibition and because your time is limited it is not so easy to overwork it. You can learn a lot from sketching in watercolour.

Even if you are not particularly mobile, if it is possible for you to get out and enjoy nature, do try and do some sketching out of doors. I’m convinced you will find it improves your work.

Painting reflections in ice

No doubt many of you can’t wait to get out into those crisp winter days, with the countryside bedecked in a white mantle of snow and the iced-up pools and puddles glistening in the pale winter sunlight. Alas, here in wind-swept Mid-Wales there is no snow, no ice and little sign of the sun at the moment. Still, in anticipation of an icy bonanza in the not-too-distant future lets have a look at capturing ice in watercolour.

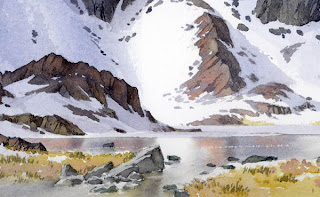
This is a small part of a watercolour painting of Ffynnon Lloer, The Well of the Moon, a beautiful tarn high up in Snowdonia. It was completely covered in ice when I last visited it. To achieve an ‘icy’ effect rather than a watery one you need to keep the surface of the water absolutely smooth – no ripples, unless you want to apply some to an area of open water. This latter method can help to show the contrast between the ice and water.

Any reflected features, such as the rocks in the above painting, should be kept simple, lacking in strong detail, and use vertical strokes of the brush when applying these reflections. I always find it works best if I use the wet-into-wet method as in this picture. If you bear in mind those few principles when you tackle ice it will hold you in good stead. Ice is one of my favourite subjects, whether in glaciers, ice-caps or just general winter scenes.

Enjoy your painting in 2012 and may it be your best artistic year ever.

Painting the first snows

Last Saturday I had my first chance this winter season to get up into the snow-bound mountains. It was lashing with rain, very cold and windy when I set off from home, to the accompaniment of comments which made several references to ‘lunacy.’ Aha! By the time I reached the Black Mountains the sky appeared even more ferocious, more threatening, the clouds snow-laden and scudding fast, now and then leaving a gap through which some peak was revealed.

As I geared myself up I barely gave the mountain ridge to the east a second glance. It looked dull and unpromising and I’d seen it in much better light. Hardly had I gone 300 metres when it suddenly exploded into a feast of light and cloud. Gone was the dullness. Within seconds it had become an amazing sight that reminded me of Tangi Ragi Tau, the Himalayan peak I’d painted several years ago, and shown above. I couldn’t see the topmost part of the ridge because of cloud, but this added to the mysterious immensity that offered itself as my first sketching subject.

The rain had gone, but the wind was vicious. I managed several sketches that afternoon, climbing high into the snow and revelling in the beauty all around. The sketch, the photograph and the finished painting will appear in publication in due course, but the lesson of all this is that however familiar you are with a subject, however many times you’ve seen it, the moment the atmosphere starts to let off fireworks like this you need your sketchbook and your camera.

I wish all my followers a Happy and peaceful Christmas, and may 2012 be your best ever!

How to paint in the dark

We’re been experiencing some dreadfully gloomy days of late, where even in the middle of the day it’s been incredibly dark, which makes painting by natural light impossible. It’s hard to see what colour you’re using at times. Switching on an ordinary light will produce a warm colour cast which can often end with strange results when eventually you view the finished work in natural daylight.

For as long as I remember, I’ve been using the marvellous lamps produced by The Daylight Company. The lamps come in many forms – some like a normal angle-poise light, some as short strip-lights as you see in the photograph, some with large magnifying glasses incorporated in the structure – I have several, and their bright, cool light is an ideal substitute for daylight. It’s also invaluable when you have to work well into those dark evenings. Another great asset is that when your eyesight is not quite what it used to be these lights do help enormously. For the artist they are a real boon, and The Daylight Company is a pleasure to deal with. Check out their website to view their full range. Craft stores, knitting shops and of course art shops are places to find them, but make sure you see their full range first to make sure you get the lamp that suits you best. Don’t let those mid-winter blues get the better of you!

Breaking up monotonous features in a coastal composition

Where you have strident blocks of cliffs or rocks on the coast they can appear both monotonous and overwhelming unless you break them up somehow. An excellent way to do this is to watch for those dynamic splashes of boisterous surf hitting the rocks and use them to break up the mass of solid rock. I often exaggerate these to a degree so that they can be more effective. This is not cheating as I often come across the most enormous and sometimes terrifying waves smashing up against the shore.

The illustration shows wild waves crashing against a long rib of rock on the west coast of Pembrokeshire. effectively breaking it up so that it appears as two different blocks of rock. Although it is an original sketch carried out on the spot with a water-soluble graphite pencil, the technique applies equally to a painting in any medium. I had just scrambled down the rocks on the left after exploring the bay on the far side, without getting too wet. The gulls added further dynamism and life to the composition.

Whether you enjoy working outdoors on location as I do, or prefer to stay indoors, it is worth breaking up features that might otherwise dominate a scene, as in this case. You don’t need to completely obliterate the central part of the feature, but it really is worth doing a small thumbnail sketch before you carry out a full painting. That will help you decide how far to go with any changes to the scene.