Watercolour Sketching in Winter

With winter upon us in the UK it is tempting to stay in and curl up in front of the fire with your watercolours, yet there are some lovely days out there when at times, like yesterday afternoon, it was perfect for watercolour sketching outside in the sunshine. What do we do, though, if we’re caught outdoors when it begins to snow or rain halfway through our watercolour?

I always carry around with me a number of Derwent Watercolour Pencils, mainly the darker ones: black, indigo, various greys and a brown or two, and I use these superb pencils to draw into wet washes of watercolour. With this technique I rarely draw an initial outline, simply going straight in with the washes as on this watercolour sketch on the left of Festvagtinden in the Lofoten Islands of Norway. As you can clearly see, rain has enlivened the sketch with many blobs, but the image relies heavily on the marks made by the watercolour pencils.

If you look carefully you will see I have used an indigo coloured pencil for the background mountain and a black one for the buildings and features closer to the foreground. Somehow I’ve managed to avoid any runs into the pristine whites of the snow slopes, mainly by mopping up with a clean, damp brush. Unless the rain is especially heavy the actual pencil line acts as a dam, thus holding off any potential runs.

As well as being able to work in wet conditions, this technique of drawing into wet washes with watercolour pencils also speeds up your sketching considerably as you don’t have to wait around for the washes to dry, so I sometimes use the method in dry conditions. This sketch is featured in my book David Bellamy’s Mountains & Moorlands in Watercolour which if available from our site. See also the excellent Derwent Pencils website. They do a wide range of colours in watercolour pencils and I sometimes just use these for the washes as well as the actual drawing. So if you haven’t tried it yet, get out there and enjoy the winter landscape!

Pastel Dust Control

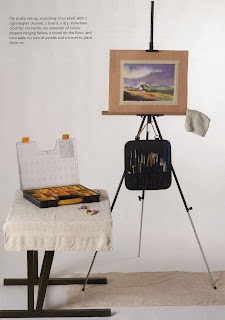
Jenny's studio set up

Jenny’s studio set up

The most common criticism of painting in pastel is the problem of dust. This can be a concern if you have breathing problems or are sensitive to dust . I am asthmatic myself. However there are a number of methods of reducing the dust considerably.

On the right is a page from my new book, Painting with Pastel, which reproduces my studio set up. (copyright Paul Bricknell and Search Press)

My three point dust reduction plan is as follows:-

1. Always work with the painting vertical on an easel with a right angled channel, (cardboard or plastic) under the drawing board. This allows the pastel dust to drift down into the channel and you do not have to blow away the excess pastel as you would if the painting was at a shallower angle. If you don’t like standing you can use a desk easel, but keep the painting vertical. You can make an angled channel with a length of mountboard. At the end of a painting session I rarely have more than a quarter of a teaspoon of dust in the channel.

2. Keep a dry flannel in your hands while you are working. This serves two purposes; it keeps your hands relatively clean and you can clean any grubby sticks as you work so that you can identify the colours easier.

3. Work on fine sandpaper; the abrasive quality of the surface grips the pastel and produces less dust than working on paper. Sandpaper also encourages you to work ‘thin’, i.e. use fewer layers of pastel. I find the colours are more vibrant on sandpaper and there is no need to build up layers to get depth of colour.

You will notice in the photograph there is also an old towel on the floor, this also absorbs any dust and prevents dropped pastels from breaking. The towel on the table helps to keep the pastel sticks clean.

The tools in the holder hanging from the easel include colour shapers for blending, brushes for removing mistakes and palettes knives for creating the spatter effect (more on that in another post) etc.

I have been experimenting with Pan Pastels, as you will see from some of my other posts, and have found that they produce much less dust than stick pastels. The method of working in Pan Pastel is quite different from stick pastel and a number new techniques need to be developed. If you want to see some of these, I have an article in the March 2012 issue of Leisure Painter Magazine. (available now)

Golden Eagle Award

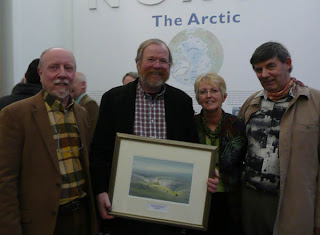
It’s always a great pleasure when someone famous acquires one of your paintings, and especially so when he is such a great guy with a marvellous sense of humour. Last week Jenny and I were in Cambridge for the presentation of one of my watercolours to best-selling author Bill Bryson by the Outdoor Writers & Photographers’ Guild at the prestigious Scott Polar Research Institute. The event was organised to present Bill with the Golden Eagle Award, presented annually by the guild to someone who has given outstanding service to the great outdoors. As president of the Campaign for the Protection of Rural England Bill has been doing sterling work, especially in his Stop the Drop campaign against litter.

The photograph shows Bill holding the painting with OWPG president Roly Smith on his right and Jenny on his left, while I lounge on Jenny’s left. Others who have received the award over past years include Sir Chris Bonington, Doug Scott and Sir David Attenborough. The painting is always some wild location and has to feature a golden eagle flying across the scene. I once perched high on a cliff in the highlands disguised as a sprig of heather, waiting for an eagle to return to its nest some distance away, but after several hours all I got was a load of ants and vegetation down the back of my neck! On returning to sea level I looked up and saw a pair of eagles hovering over my earlier hideout.

Painting Tranquil Scenes in Watercolour

It’s always nice to know your books are appreciated and the heartening news is that my Complete Guide to Watercolour Painting has been awarded the distinction of ‘one of the best How-to books of the year’ by the US Library Journal in New York. This, I believe covers all sorts of how-to books, not just art, so it is really pleasing that it has been recognised in this way.

This watercolour, Norfolk Wetlands, is featured in the book, and looking at it I can still hear the water lapping against the shoreline and the sheer peace and tranquillity. Notice how although the main emphasis of detail is on the left-hand side it still works as a composition. Sometimes it’s good to break the rules and try for something a little different. I’ve placed the birds leading away from the focal point (the trees), and also highlighted the focal point with strong tonal contrasts. If you want to emphasise tranquillity then keeping your composition mainly horizontal will help enormously. Avoid to many strong verticals.
The Complete Guide to Watercolour Painting is now available in paperback, with a great many hints and tips crammed into its 128 pages. Signed copies are available from  http://www.davidbellamy.co.uk

Painting massed trees

The other day, despite poor weather I went out for a walk, optimistically taking my sketching gear along……..but then, I’m never without it anyway. The morning became even drabber, the weather forecasters had really screwed this one up! However, we shouldn’t be too despondent as we can learn so much outdoors, even in the direst of weather.

I suddenly came upon this view of a conifer wood, and marvelled at the simple moody beauty. Apart from the closer trees, all detail is lost in the atmosphere – here was a superb lesson on how to cope with massed trees in a painting, courtesy of Mother Nature herself. You can easily make out the various tones, getting stronger as the massed trees get closer, and it makes the rendering of them so much easier when approached this way. In a painting you would do best to lose some of those edges – perhaps have an intermittent edge on the rows of trees, as in fact you see in the middle line.

This technique can be used in good weather as well, of course. I’ve been out again today in glorious sunshine and the same effect on massed trees was clearly visible when viewing them against the sun. Practice the method with your watercolours. If you have a large area of massed trees try to avoid putting in too many of the lines of trees, and often a half-line can be equally effective. These lessons are all around us, so keep your eyes open – you don’t even need a sketchbook!