Pastel Dust Control

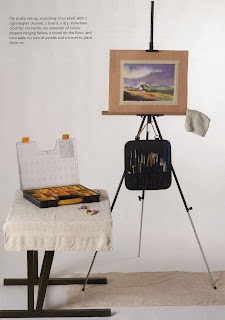
Jenny's studio set up

Jenny’s studio set up

The most common criticism of painting in pastel is the problem of dust. This can be a concern if you have breathing problems or are sensitive to dust . I am asthmatic myself. However there are a number of methods of reducing the dust considerably.

On the right is a page from my new book, Painting with Pastel, which reproduces my studio set up. (copyright Paul Bricknell and Search Press)

My three point dust reduction plan is as follows:-

1. Always work with the painting vertical on an easel with a right angled channel, (cardboard or plastic) under the drawing board. This allows the pastel dust to drift down into the channel and you do not have to blow away the excess pastel as you would if the painting was at a shallower angle. If you don’t like standing you can use a desk easel, but keep the painting vertical. You can make an angled channel with a length of mountboard. At the end of a painting session I rarely have more than a quarter of a teaspoon of dust in the channel.

2. Keep a dry flannel in your hands while you are working. This serves two purposes; it keeps your hands relatively clean and you can clean any grubby sticks as you work so that you can identify the colours easier.

3. Work on fine sandpaper; the abrasive quality of the surface grips the pastel and produces less dust than working on paper. Sandpaper also encourages you to work ‘thin’, i.e. use fewer layers of pastel. I find the colours are more vibrant on sandpaper and there is no need to build up layers to get depth of colour.

You will notice in the photograph there is also an old towel on the floor, this also absorbs any dust and prevents dropped pastels from breaking. The towel on the table helps to keep the pastel sticks clean.

The tools in the holder hanging from the easel include colour shapers for blending, brushes for removing mistakes and palettes knives for creating the spatter effect (more on that in another post) etc.

I have been experimenting with Pan Pastels, as you will see from some of my other posts, and have found that they produce much less dust than stick pastels. The method of working in Pan Pastel is quite different from stick pastel and a number new techniques need to be developed. If you want to see some of these, I have an article in the March 2012 issue of Leisure Painter Magazine. (available now)

Getting out of a rut – Misty marsh in Pan Pastel

Misty marsh in Pan Pastel

Misty marsh in Pan Pastel

The inspiration for a painting can come in many shapes and forms but most frequently it is a combination of atmosphere and light that sparks the fire.

The sparkle of light on water and a gauze of mist lends enchantment to almost any scene.

In this painting the misty effect was achieved with Pan Pastels on a sheet of white Clairefontaine Pastel Mat paper.

The method of applying the Pan Pastel colour with sponges naturally lends itself to soft edges. The water is mainly the paper left untouched but the highlights on the clouds were created with a small Sofft

tm tool which looks like a plastic palette knife with a sponge sleeve and is very effective for smaller areas.

The challenge of working with Pan Pastels, which does not lend itself readily to creating sharp edges, has made me re-evaluate the amount of fine detail I include in a painting and has ‘loosened up’ my recent work. Working with different methods of applying colour is a stimulus that can get you out of a rut.

Go on try something new.

I will be running a pastel painting course in Cheddar next autumn if you would like to learn more about my methods of working.

More Pan Pastels – Monument Valley

This is another painting that I did with Pan Pastel. This time I used a sheet of white Clairefontaine Pastel Mat paper. This paper has a good tooth which is not quite so ‘sharp’ as sandpaper.

The challenge this time was the warm colour of the distant features, especially the right hand mitten, which would make creating a sense of recession quite difficult. When the painting was almost finished the colours of the two ‘mittens’ was very similar so I loaded the oval sponge with a light coating of white pan pastel and patted it gently over the distant ‘butte’ to push it into the distance.

My family and I travelled to Monument Valley earlier this year to celebrate my 60th birthday. Since a child I have loved cowboy films and many of them were filmed in this very special scenery. To fulfill one of my lifetime ambitions, we hired horses and went riding through the buttes with a Navajo guide. We also went to the Grand Canyon, Bryce Canyon and Mesa Verde, so we ticked off several more of my amibitions whilst we were there.

Experimenting

Twilight Cottage

In order to develop our painting skills, it is a good idea to experiment from time to time, Often this starts with just making a bit of a mess. A while ago I wanted to try using Mixed Media on the sandpaper, Fisher 400 Artpaper, that I love to use for my pastel paintings, as I was aware that it was waterproof, unlike the industrial sandpaper that I used before Fisher 400 was produced.

This painting of Twilight Cottage, started with an ink outline of the building, followed by a watercolour wash of Naples Yellow and Ultramarine in the sky and Cadmium Orange and Cadmium Yellow in the foreground. I let this all mingle and some of the ink drawing ran into the washes.

At first I thought that this was a mistake but when it was dry the dirtyness of the cottage appealed to me and also suggested a low light. So I worked into the painting with pastel, leaving large areas of the watercolour washes showing and added some undergrowth in the foreground with the scraping technique, which involves scraping flakes of pastel onto the painting and pressing them into the surface with a palette knife. This creates a spatter which resembles flowers or seed heads.

You can read how to create the scraping technique in my book, and you can see it demonstrated in film on my DVD,. The book and dvd are entitled Painting with Pastel and are on special offer our website.

Pan Pastels

Recently, I’ve been experimenting with the new Pan Pastels made by a US company. They come in flat cakes, and are applied with sponges. The finely ground pigment creates vivid colours and soft, subtle nuances of tone. Blending is easy with the various shaped sponges and Sofft ™ tools which come in a range of different shapes and sizes.

You can combine the Pan Pastels with pastel pencils for the fine detail and the use of colour shapers, especially the flat chisels allows you to sharpen endges. If you like painting pastels onto sandpaper, as I do, you will find that the use of the sponges for applying and blending the colours avoids the problem of damaging your fingers of the abrasive surface of the sandpaper.

You also use a lot less pastel and there very little dust. I am delighted with the way this new form of pastel paint forces me to use new techniques and develop my style in a new and exciting direction.

Visit the Pan Pastel website to find out more and visit their facebook page, where you will find more of my work in pan pastels displayed. Comments welcome