Breaking up monotonous features in a coastal composition

Where you have strident blocks of cliffs or rocks on the coast they can appear both monotonous and overwhelming unless you break them up somehow. An excellent way to do this is to watch for those dynamic splashes of boisterous surf hitting the rocks and use them to break up the mass of solid rock. I often exaggerate these to a degree so that they can be more effective. This is not cheating as I often come across the most enormous and sometimes terrifying waves smashing up against the shore.

The illustration shows wild waves crashing against a long rib of rock on the west coast of Pembrokeshire. effectively breaking it up so that it appears as two different blocks of rock. Although it is an original sketch carried out on the spot with a water-soluble graphite pencil, the technique applies equally to a painting in any medium. I had just scrambled down the rocks on the left after exploring the bay on the far side, without getting too wet. The gulls added further dynamism and life to the composition.

Whether you enjoy working outdoors on location as I do, or prefer to stay indoors, it is worth breaking up features that might otherwise dominate a scene, as in this case. You don’t need to completely obliterate the central part of the feature, but it really is worth doing a small thumbnail sketch before you carry out a full painting. That will help you decide how far to go with any changes to the scene.

Lost & Found technique in a painting

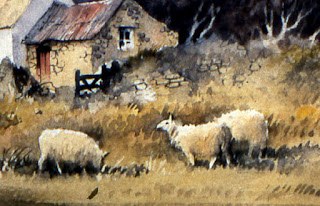
In a painting, when you overstate detail you will detract from the impact the work imparts on the viewer.  The answer is to simplify matters by leaving out much detail and lessening the effect of what remains in what we call a ‘lost and found’ method. This technique is seen quite clearly in the section of a painting of the wall at the home of Witch Coarsecackle, as illustrated below:

The stonework is only revealed in places, and by washing a transparent glaze over it the otherwise stark edges of the stones have been softened. Also note how the window has been rendered, losing strong detail lower down to stop the whole becoming rather boring. I used the negative painting technique here, but masking fluid might well have been an easier technique. Ignore the rather strange-looking creatures in the top right-hand corner as they add more to the narrative than to the aesthetic appreciation of the lost and found method.

You will find the ‘lost and found’ method featured in all my art books, but for further information on Witch Coarsecackle and her amazing abode you can check out The Grog Invasion on my website. It is the first book of the Chronicles of the Llandoddies, the legendary water-folk of Llandrindod Wells, and a great tonic for those who need a good laugh and escape from the realities of modern life, aimed at kids from 9 to 99. Coarsecackle is herself a portrait artist of some renown and a film on her methods is under preparation.

Having fun with your old paintings

What do you do with those old paintings that end up in a mess and clearly have not worked? Turn them into paper darts? Use the backs for another painting? Frame them and give them to your least favourite aunt for Christmas? Whatever you do, don’t tear them up or throw them away as they are more valuable than you may imagine.

If you keep your old ‘failures’ in a folder the time will come when you will find them extremely useful to practice techniques. In this scene of Tideswell Moor in the English Peak District you will see a dark cloud on the left with a rain squall beneath it. This was achieved with a glaze – a transparent wash laid over an already-painted part of the composition, once it had completely dried. In this case it was done by wetting the paper first so that a soft edge would be achieved on the falling ‘rain’.

Most inexperienced artists find this glaze technique rather daunting, and of course it is easy to mess up an otherwise competent painting. In order to gain practice with this technique there is nothing better than to do it on your old ‘failed’ paintings. You have nothing to lose and you might end up with a really good painting after all. The glaze method can be useful for warming up or cooling down a painting or an area within that painting, or for creating shadow or falling rain as in this case where you wish to suggest a film of atmosphere in between the viewer and part of the composition. Have fun with your old paintings!

Critical observation

When I talk about sketching outdoors I am well aware that so many artists lose interest – they prefer to stay indoors, warm and comfortable and work from photographs, books, calendars and so on. ‘Sketching’ is a dirty word to many, although for me it is one of the most rewarding things I do. Still, for those of you who don’t wish to venture beyond your front door, you can still learn a lot by critical observation.

This exciting picture was taken in my hotel bedroom last week in London, and if you look carefully you will observe a number of subtle effects concerned with direct and reflected light. The main light is entering through a window to the right, illuminating the right-hand wall and the right-hand edge of the door architrave in the centre, but where this is blocked by an object in the top right-hand corner the most powerful light there comes from the light bulb above the top left-hand corner.

If you look carefully you should be able to see a slight lightening of the vertical thin strip of wall in the centre where reflected light is bouncing back from the illuminated architrave.  Again, at the bottom of the scene you can see further counterchange on wall and architrave caused by a table in the bottom right-hand corner.

Simple scenes like this can provide an excellent idea of how light affects various surfaces and angles. You can observe these effects without having to go out into hostile terrain, or the need to do any sketching. Make it a habit whether you are indoors, outdoors, or sitting in a rickshaw waiting for the traffic lights to change.

In the December issue of Leisure Painter magazine you will find a complete article I wrote on the subject of observation, and I have a further piece on-line at http://www.painters-online.co.uk/  Critical observation like this can also while away the time as you wait for a train or whatever, and it can be great fun!

Sketching and drawing with watersoluble pencils

This post is in response to Michael Bailey’s comments about the Karisma aquarelle pencils – marvellous watersoluble pencils that were so useful for sketching in all weathers as you can lay on the pencil tone and brush water across it to create lovely washes in various degrees of tone. They enabled you to create lovely, moody pencil sketches and drawings.

The rough sketch on the left was done with a medium Karisma pencil many years ago. It shows an ice cave in the Argentiere glacier, with great blocks of ice fallen by the entrance, and gives a fair idea of the variety of tones you can achieve with a watersoluble graphite pencil. You can clearly see the vertical pencil hatching on the side of the large horizontal ice slab where it has not quite washed out.

When the Karisma range sadly disappeared off our art-shop shelves we looked around for a replacement, and after some experiments found the Caran D’Ache Technalo range to be a good alternative. Like Karisma, the Technalo watersoluble pencils come in a range of three: HB, B and 3B, to give you a light, medium and dark tone.

Thanks for your kind comments, Michael – I hope this helps. I don’t, by the way, normally use these pencils with watercolours to produce paintings as some graphite will always wash off and muddy up the colour, although I have used them as an exercise in one of my earlier books to show tone and then applied light washes to help illustrate a point. They are excellent tools for learning about tones.